Be sure to check the current Resident Game Bird seasons and regulations before heading afield.
Or learn about our pheasant release programs, including the Western Washington Pheasant Release Program and Eastern Washington Pheasant Enhancement Program.
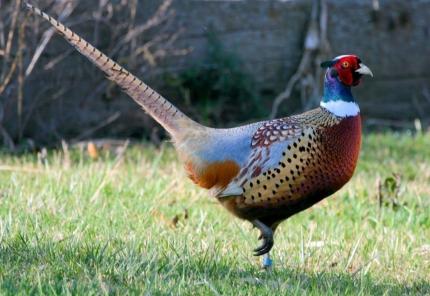
Ring-neck pheasant
The ring-neck pheasant is one of the largest and certainly the most brightly colored of Washington’s upland birds. An adult male (rooster) ring-neck weighs two and a half to three pounds and measures up to 35 inches from the tip of its beak to the tip of its tail. That long, pointed tail may account for over half the overall length. An adult hen pheasant weighs about two to two and a half pounds and has a much shorter tail.
As with many bird species, the male ring-neck is much more colorful than the hen. The underside of a mature rooster is an iridescent rust-red on the lower neck and breast, turning darker on the belly and lighter with dark spots on the sides. The back is light-brown with darker spots at the lower neck, turning a deeper reddish-brown with ever-larger cream-colored markings toward the tops of the wings. A blue-gray rump patch gives way to more rust-red coloration behind the legs and around the lower base of the tail, which is light to medium brown with 12 to 30 dark-brown bands. A distinctive white ring runs around the middle of the neck, and above that most of the head is an iridescent dark blue-green with hints of purple. There’s a small tuft of feathers at the back of the head and often a cream-colored crown at the top. A bright-red wattle around the eyes and down the cheeks rounds out the rooster pheasant’s head-gear.
The ring-neck isn’t native to Washington, or even to North America. The first pheasants were brought from China and successfully introduced into western Oregon in 1881. Washington received its first ring-necks in 1883, and heavy plants were made in Western Washington in the early 1890s and in several areas of Eastern Washington later in that decade. The first Evergreen State pheasant season opened in 1897.
A few small, self-sustaining populations of ring-neck pheasants occur in the agricultural areas west of the Cascades, but the grain-producing lands on the east side of the state provide the best pheasant habitat and, by far, the highest ring-neck populations. WDFW releases thousands of pen-raised birds in both Eastern and Western Washington to supplement the wild pheasant population and provide additional opportunity for upland bird hunters.
Like all wildlife, wild pheasants require adequate food, cover and water to thrive, and areas that offer all three in abundance are likely to hold the largest bird populations. Agricultural crops such as wheat, corn, soybean and sunflower are favorite ring-neck foods, but they also eat seeds from a variety of grasses, weeds and other plants. Pheasant chicks eat grasshoppers and other insects for the first six weeks of their lives, and adult birds also will feast on ‘hoppers from time to time. Nesting and hiding cover includes uncultivated fields of mixed grasses and weeds; hay fields; hedge rows; fence lines; road rights-of-way and ditches where vegetation is allowed to grow; weather-break tree rows; stands of small trees and brush; cattail patches; uncut crop fields and harvested fields where tall stubble and/or piles or rows of unharvested vegetation remains; riparian areas, especially those with lush grass or brush cover.
Climatic and habitat conditions earlier in the year, especially in late-spring and early summer, play a major role in determining what kind of success Washington pheasant hunters are likely to have finding wild birds in the fall. Cool, wet weather in late-spring, for example, can be devastating to newly hatched chicks, while mowing, plowing and burning can destroy nests and kill young birds. Large numbers of pheasant chicks may starve if conditions are such that grasshoppers and other insects are in short supply. When these and other problems lead to poor reproduction and low chick survival, there are few young-of-the-year roosters available in the fall, and because yearling birds typically account for 80 to 90 percent of the fall harvest, the pickings can get pretty slim for hunters in those places where spring production is down.
Hunting Strategies

Many of the most experienced, serious and successful pheasant hunters begin preparing for the hunt long before the season actually opens. They get themselves in shape and their dogs fine-tuned during the summer. They spend an evening or two a week at the range, shooting trap, skeet or sporting clays. They spend time on-line to glean any useful information they can find and they pour over maps in search of new—and perhaps better—places to hunt. They make scouting trips to places they’re likely to hunt in the fall, to get an idea of how many birds are around and where they might be congregated. During those scouting trips they stop to introduce themselves to landowners who might allow access to their property during the coming season and to re-establish relationships with landowners who have allowed hunting in the past. The more of these tasks you accomplish before pheasant season, the greater your chance of success when that season finally opens.
Getting an early start can pay off for pheasant hunters, and we’re talking about “early” in more than one context. Taking to the field early in the season provides the opportunity to get first crack at young, unwary and “uneducated” birds that haven’t yet figured out the dangers of getting too close to hunting dogs and people wearing bright-orange clothing. Those that survive the first week or two of the season tend to smarten-up a lot, and therefore become harder to hunt. Starting your hunt early in the day gives you a crack at pheasants that are leaving their roosts to search for food and grit, and active birds in more open country are easier to find. Like many game animals and birds, ring-necks are often most active during the first two hours of the morning and again during the last hour or two before dark.
The most successful pheasant hunters are part of a team, and their teammates may include both the human and the canine kind.
The value of a good pointing or flushing dog to a pheasant hunter can’t be overstated. Hunting ring-necks without a dog is like salmon fishing without a depthsounder/fishfinder; you can certainly find success without a four-legged partnr, but your chances will increase several times over with a dog doing the searching and you doing the shooting. A savvy rooster can hunker down and become invisible in an amazingly small patch of cover, going undetected by a hunter walking by only a few feet away. The canine nose, though, is a wonder of nature, easily capable of detecting the most well-hidden pheasant, and leading your dog—and you—to far more shooting opportunities than you’d have on your own.
As for what dog is best-suited to Washington pheasant hunting, that’s a matter of personal preference. A German shorthair, English pointer, Brittany, Weimaraner or any breed of pointing dog locked up on rigid point is a thing of beauty, and gives a hunter advance notice that it’s just about shooting time. Labrador retrievers, Springer spaniels and other flushing breeds, on the other hand, are sometimes more effective in heavy cover and around water, and may be more willing than pointers to retrieve downed birds.
Whether you go with a pointer or a flusher, though, be sure that it’s a well-trained and disciplined dog. A wide-ranging pointer that noses birds into the air before you get there or a flusher that insists on working 150 yards out isn’t going to help put many birds in your game bag and will make for very frustrating pheasant hunting.
Two or more good two-legged hunting partners can also greatly improve your pheasant-hunting success, provided you work as a team. There are several ways pheasant hunters can benefit from teaming up rather than hunting alone. Three or four pairs of legs can cover a lot more ground and kick a lot more birds into the air than one pair can, and that means more potential shooting opportunity for everyone involved. Two or more hunters can work both sides of a thick hedge row or brushy ditch line and get shots at birds that fly out on either side. Hunting a field of standing corn, a cattail patch or other tall cover can be an exercise in futility for a lone hunter, but with a small group you can send two or three hunters through the cover and post a couple of “blockers” at the far end of the patch to pick off exiting birds.
Early season pheasants often sit tight and flush fairly close, which makes them perfect targets for small groups of hunters. Walk a zigzag pattern and stay fairly close together to cover more ground and keep pheasants from sneaking away between hunters.
If there’s such a thing as “easy” pheasant hunting, it occurs during the first week or two of the season, when young birds are abundant (if it’s been a decent production year) and mature birds have had many months to forget about dogs, hunters and shotgun blasts. That’s also when hunting pressure is highest, but with a little persistence (and/or some advance planning and scouting) you can usually find a patch of public or private land that holds birds. As pheasant season progresses, though, wild birds quickly become truly wild, the fair-weather hunters find other things to do with their time, and bagging a limit of ringnecks may become more challenging. But it can still be done, if you’re willing to work a little harder.
Birds that survive the first few weeks of the season have learned that it’s best to avoid humans and their canine companions, so they resort to hiding, changing their daily habits, moving to a new neighborhood and/or flying at the first sight or sound of hunters and their dogs. If you want to keep harvesting pheasants, you change your tactics accordingly. Lace up your hiking boots and get farther off the beaten path to look for birds that roadside hunters haven’t yet found; hunt the really thick cover where other hunters and their dogs might fear to tread, including heavy cattail patches, standing crops (with farmer approval, of course) and thick stands of Russian olive and other trees and high bushes. In areas where corn and other grain or seed crops have been recently harvested (since the start of the season), hunt the cover immediately surrounding the cut fields for birds that didn’t travel far from their former hiding spots.
And, since you’re hunting spooky birds later in the season, be as sneaky and quiet as possible, avoiding loud talking, whistling for your dog every 20 seconds and other noises that might alert birds to your presence and send them flying or running into the next county.
Guns and Ammunition
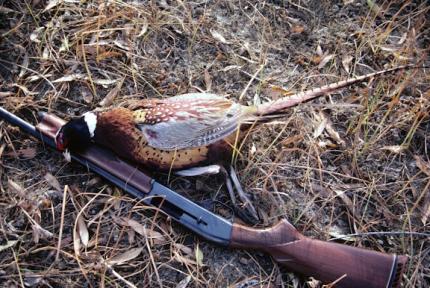
Ask any group of bird hunters to describe the “perfect” shotgun, choke and ammo load for hunting pheasants and you’ll likely get a wide range of answers. That’s not only because every hunter has his or her own personal biases and preferences where shooting is concerned, but also because the right gun for one set of pheasant-hunting circumstances may be all wrong for a different situation. A smaller person who likes to hunt released birds or who covers a lot of ground in a day and who has a dog that hunts close might prefer a lightweight 20-gauge or even a 28-gauge or .410 shooting size 6 or 7 ½ shot, while the guy who’s expecting longer shots on wild birds late in the season may be much more comfortable shooting heavy loads of size 4 or 5 shot through a long-barreled 12-gauge with a modified or full choke.
An all-around gun and ammo load for most pheasant hunting is somewhere between these two extremes, or at least a combination of them. It’s a safe bet that the 12-gauge is the most popular gun in most of Washington’s pheasant haunts, and a 12-gauge that features options will serve a hunter well in most of the hunting situations he or she is likely to encounter. One way to go is a side-by-side or over/under with an improved cylinder bore for the first shot and a tighter bore—modified or even full—if a second shot is needed. A pump-action or semiautomatic gun gives a hunter three shots rather than two, and most automatics are certainly gentler in the recoil department. Adjustable chokes and choke tubes on a pump or auto, though, provide options for different hunting situations but don’t allow for changing to a tighter bore as a rising bird gets farther away; whatever your choke setting when a ring-neck rises from the ground 20 yards in front of you for the first shot is the one you’re using as you take that third, desperate shot at 50 yards. Whatever action you chose, you may find them with barrel lengths of 26 to 30 inches, but a 28-inch barrel is pretty much the standard among Washington pheasant hunters.
While a 12-gauge is the most commonly used pheasant gun, the smaller 20-gauge shouldn’t be overlooked, especially by smaller hunters, including women and kids. Good shooting with a 20-gauge will take more ring-necks than bad shooting with a 12-gauge any day. Like the 12-gauge, 20-gauge shotguns are available in several actions and barrel lengths, and, especially if chambered for three-inch shells, pack enough wallop to knock down any pheasant within reasonable shooting range.
Whatever the size and action of the gun you choose for pheasant hunting, though, be sure that it fits you, both in terms of physical length and weight and the kinds of shots you’re likely to get. Be sure you can bring it up to firing position quickly, smoothly and easily, then practice with it until you can shoot it well.
Just as there’s no perfect shotgun for each and every pheasant-hunting situation a hunter might encounter, neither is there a perfect shot shell for every shot you’ll get in pheasant country. There are, however, some options that will do the job for most pheasant hunters, most of the time. Although steel shot is now required for pheasant hunting in some areas of the state, lead shot is still allowed in many areas, and commonly used lead shot loads for pheasant hunting ranges from size 7 ½ to size 4, with 6’s the most popular for all-around use. As a general rule, larger shot has more knock-down power at longer ranges, so many hunters shooting lead like a load of 7 ½’s or 6’s for their first—closest—shot and larger 5’s or 4’s for subsequent shots. Most pheasant hunters shooting 12-gauges use standard 2 ¾-inch shells holding an ounce and a quarter of lead shot, but some, working under the logical assumption that more shot in a pattern is likely to result in more birds on the ground, are going to larger, three-inch shells that throw up to 1 ¾ ounces of shot. Likewise, more and more 20-gauge users are going from one-ounce shot loads in a standard 2 ¾-inch shell to three-inch shells carrying an ounce and a quarter of lead.
As mentioned earlier, pheasant hunters must now use only nontoxic shot in some parts of Washington, including all pheasant-release areas. To most hunters, nontoxic means steel, because it’s been around the longest and is the cheapest of the nontoxic loads. Steel is much lighter than the traditional lead shot once used for pheasant hunting, so it hits a target with less energy if adjustments to shot size, choke, and velocity are not factored in. As a general rule, pheasant hunters switching from lead to steel should increase their shot by at least two sizes, so if you favor lead 6’s and go to steel, you might try 4’s. Studies conducted in some areas have shown size 2 and 3 shot to be the most effective steel loads for pheasant.
And steel isn’t the only nontoxic option. Hunters willing to spend more—in some cases a lot more—for their ammo can buy loads of bismuth-tin, iron-tungsten, iron-tungsten-nickel, tungsten-bronze, tungsten-tin-bismuth and others, many of which have ballistics similar to lead shot.
Whatever shot size, load size, velocity and shot material combinations you choose, be sure to pattern a round or two through your shotgun at various distances. Aim at a small dot in the center of a 30-by-30-inch paper square, first at 20 yards, then at 30 yards and again at 40 yards. Compare the shot patterns at the three distances, and if you’re satisfied that the pattern covers the square evenly and fully, you’ve found the right load for your gun. If there are obvious gaps in the pattern, or if it appears that far too few of the pellets hit the target, you need to make a choke adjustment or try another load that will perform better.
Shooting
Even though it’s one of the largest targets an upland bird hunter is likely to shoot at, a mature pheasant can be surprisingly difficult to hit, or at least to knock down. The pheasant’s anatomy is part of the problem. It’s long tail comprises about half of a fully grown rooster pheasant’s body length, and shooters who make the mistake of targeting the center of the bird’s body while swinging on birds that are crossing or quartering away are likely to hit nothing more than tail feathers. It’s important to use the tip of the beak, not the center of the body, as the primary target point whenever possible. Hitting a pheasant a little farther forward than you planned is much better than hitting it a little farther astern, because a pellet or two in the head or neck will bring it to the ground, while the same pellets through the tail plumes will do absolutely nothing.
Its layers of tough feathers, especially on its back and wings, also help protect the pheasant from hunters who make less-than-perfect shots and from good shots that lack adequate punch. Hunters know that the best hits are the “kill” shots that put pellets into a bird’s vital organs and result in instant death, and the next-best shots are those that break bones—especially wing and leg bones—that bring a bird quickly to the ground and keep it there so that it can be quickly retrieved. A mature pheasant’s armor of tough, hard feathers, though, can be amazingly effective at protecting both its vital organs and its moving parts, so if your target is out there a little too far, or if your pellet size is too small, or if you simply don’t put enough pellets into the bird, you’re likely to draw feathers but no blood. Even worse, you may cause injuries that result in your prize’s death long after you’ve cased your shotgun and gone home. Keep that in mind when you’re selecting your shot-shell loads, and when deciding whether to take a questionable shot or pass it up.
Probably because of its large size, a pheasant appears to fly more slowly than it’s really flying, which no doubt leads to innumerable missed shots every season. Determining proper lead on a rising ring-neck may be difficult, and often-contradictory suggestions from other hunters probably won’t help you hit more birds. The amount of lead, if any, may depend on a wide range of factors, including shooting distance, flight speed and direction, wind, and the shooter’s own reflexes and hand-eye coordination.
A few general shooting guidelines, though, may be helpful:
- Take your time with the first shot, for several reasons. First, if the bird rises at close range, your shot pattern will be extremely tight, likely resulting in a complete miss or a bird that’s blown to pieces. Secondly, a rising pheasant often makes a quick adjustment in direction a second or two after takeoff, and Murphy’s Law says you’ll pull the trigger at exactly the time that direction change happens, resulting in a missed shot. Hunters who shoot over dogs have another reason to wait a count or two before taking that first shot, and that’s to give the bird a chance to increase the distance between itself and your favorite hunting companion; shoot when the bird’s too close or too low and you could seriously injure your dog. Perhaps most importantly, taking a little time before pulling the trigger gives you some time to settle into a smooth, comfortable swing, which is more likely to pay off than a quick shot taken when you really weren’t quite ready to shoot.
- Follow through on every shot. Keeping the muzzle swinging after your pull the trigger helps ensure against shooting behind a bird.
- If a bird is rising, swing up through it and fire as you blot out the target with the gun barrel, but continue following through on the upward swing after you fire.
- Shoot slightly under—not over—a bird that’s flying straight away or dropping slightly as it flies away.
- Practice. Spend time shooting trap, skeet and sporting clays so that you can handle various shooting angles and target speeds, and, if possible, take advantage of opportunities to shoot live birds under controlled conditions before taking to the field.