Pollinators need us, and we need pollinators. Bees, birds, bats, butterflies, beetles, and other insects and small mammals play a very important role in our ecosystem and food production. In fact, pollinators bring us three-quarters of our food! They also keep our ecosystems healthy by helping plants reproduce.
This nearly invisible service that pollinators provide is increasingly in jeopardy. Check out the lessons and activities below to learn about different pollinating creatures, their importance to ecosystems around the world, and how you can help them.
Materials
- Pollinator Activity Book (PDF) (Courtesy of USDA)
- Bat Pollinator Activity Book (PDF) (Courtesy of Bat Conservation International)
- Flap Your Wings For Bats Template (PDF) (Courtesy of BatsLIVE)
- Pacific Northwest Bumble Bee Guide (PDF) (Courtesy of PNW Bumble Bee Atlas)
Who are pollinators?
Birds, bats, butterflies, moths, flies, beetles, wasps, small mammals, and most importantly, bees are pollinators. They visit flowers to drink nectar or feed off of pollen. Then, they move pollen from male structures of flowers to the female structure of the same plant species. This movement of pollen results in fertilization of the flower's eggs which then produce seeds to create a new generation of plants.
Pollination is good for both pollinators and plants. While plants get help with reproduction, pollinators are getting important nutrients from the sugary nectar, including carbohydrates, fats, vitamins, and minerals.
Watch this 5-minute video to learn more different types of pollinators.
Now that you know the basics of pollinators, watch this 15-minute video to learn about the threats pollinators face around the world and how you can protect them.
Activity: Pollinator activity books
Complete the variety of puzzles, games, and coloring pages in the two pollinator activity books provided to learn about invertebrates, bats, and other important pollinators.
Gather your materials
- Pollinator Activity Book
- Bat Pollinator Activity Book (PDF)
- Color pencils, crayons, or markers
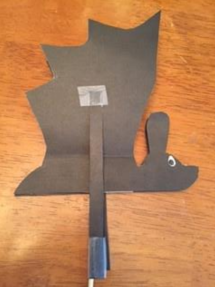
Activity: Flap your wings for bats
As you've learned, insects and birds aren't the only important pollinators. Globally, more than 500 plant species depend on bats to pollinate their flowers, including species of mango, banana, guava, agave, eucalyptus, and many giant cacti. The pollination of plants by bats is called chiropterophily.
Plants pollinated by bats often have pale colored flowers compared to bright flowers that attract bees and butterflies. Some bats have evolved specifically to reach the nectar of large, bell-shaped flowers. The tube-lipped nectar bat of Ecuador and the banana bat that lives only on Mexico's Pacific coast both have extraordinarily long tongues for this exact reason. The tube-lipped nectar bat’s tongue is more than one and a half times the length of its body!
Watch the short video below to see the tube-lipped nectar bat in action!
Gather your materials
- Two pieces of cardstock (black, brown, or other batty color)
- Straw, bamboo skewer, or small wooden dowel
- Printed template (PDF)
- Tape or glue
- Scissors
Instructions
Print off the template to find directions to make your own flying bat. When you have completed the project, you can flap your wings to show your support for these amazing fliers and pollinators!
Community science for bees
Did you know that YOU can be a valuable research partner for scientists? Community science helps researchers gather more diverse and widespread data. You can become a community scientist by sharing what you see in your neighborhood. Learn more about pollinator community science projects you can be involved in from our partners at the Xerces Society.
Watch this 8-minute video to learn fascinating information about the small but mighty bees we depend on for things like bananas, nuts, and coffee!
Activity: Learn to identify bumble bees
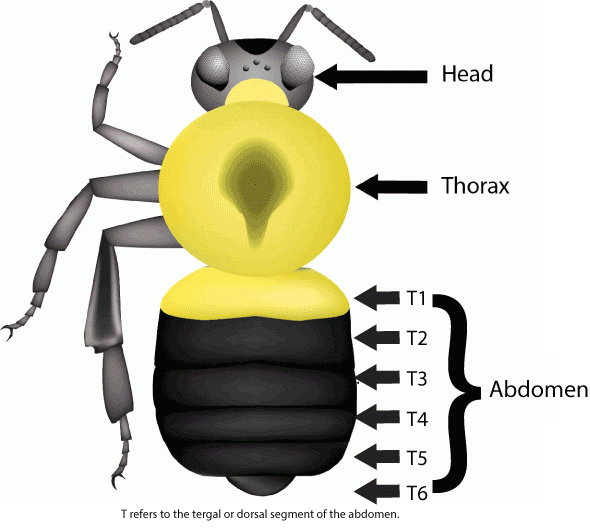
When you think of a bumble bee, do you picture the iconic yellow and black stripes? Most bumble bees have those black and white stripes, but they can also have white, red, and orange coloring. Like all insects, bumble bees have three main body parts: head, thorax, and abdomen.
The coloration of these parts is used to identify bumble bee species. With careful observation, you can learn to identify the different species of bumble bees in your backyard.
Gather your materials
- Camera or phone
- Pacific Northwest Bumble Bees Guide (PDF)
- Clear container like a mason jar (optional)
Instructions
- Take photos of a bumble bee. Try waiting near an open flower for a bee to land. Then take several photos from different angles. This will help you identify the bee later. Check out these additional tips for photographing bees from our friends at Bumble Bee Watch.
- If you feel comfortable, try collecting the bumble bee in a clear container to take close up photos. Then release the bee so it can continue its important pollination work.
- Using the Pacific Northwest Bumble Bees guide, look to see if your bee resembles any of the common bees in Washington. Remember to look at the coloration of the head, thorax, and abdomen.
- After identifying your bee, you can use the Bumble Bee Watch species website to learn the types of flowers it prefers, how large its range is, and when you can expect to see it each year.
Activity: Help scientists study bumble bees
Scientists across North America are working together to study nearly 50 species of bumble bees and why their populations are declining. Causes include loss of habitat, pesticide use, climate change, and competition with honey bees.

Scientists need a better understanding of where bumble bees are to help protect them. You can help them by sharing photos of bumble bees you find near your home and neighborhood.
Gather your materials
- Camera or phone
- Computer
- Clear container like a mason jar (optional)
Instructions
- Download the free Bumble Bee Watch app (App Store / Google Play) or create a Bumble Bee Watch account from your computer.
- Take a photo of a bumble bee. It can be hard to photograph a moving bee so try waiting near an open flower for a bee to land. Then take several photos from different angles so you can identify the bee later. Collecting bees in a clear jar allows you to take close up photos, but be sure to release it afterward. Check out these additional tips for photographing bees.
- Log in to your account and upload your photo (Watch this 9-minute step-by-step video for help).
- The website will help you determine which species of bumble bee you observed. Do your best to identify the bumble bee based on its markings. Your sighting will be verified by an expert.
Pollinator-friendly plants
When flowers are blooming pollinators are busy searching for pollen. Have you noticed plants near your home that seem to attract a specific pollinator? Do you know what type of plant it is? Learning which plants are already in your yard will help you add complimentary plants to support even more pollinators.
There are many resources to help you identify plants. Your family may already have plant identification books. There are also many online resources such as Washington Native Plant Society and apps like iNaturalist to help you identify plants.
Resources
- Download your free planting guide based on your zip code from our friends at the Pollinator Partnership.
- Download the Attracting Pollinators to Your Garden booklet from the U.S. Fish and Wildlife Service.
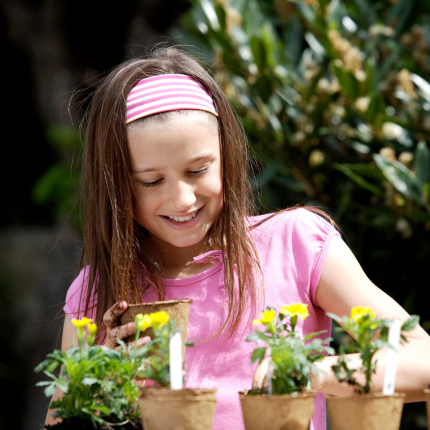
Activity: Create a pollinator garden
Once you’ve identified what you already have, you can begin planning additional pollinator-friendly plants to add to your yard, porch, balcony, or nearby greenspace.
Gather your materials
- Paper and pencil
- Gloves
- Water
- Compost
- Native plants or seeds
Instructions
- Pick a location. Pollinators enjoy sunshine and some of their favorite flowers grow in full sun or partial shade. They also prefer protection from the wind. Mark these locations on your landscape design.
- Assess your soil. Some plants prefer sandy, well-drained soil, others prefer wetter soil that is more like clay. Dig in and feel the grains between your fingers. Sandy soils will feel gritty and will fall through your fingers. Clay soils will feel smooth and sticky when wet.
- Choose native plants. Get the most out of your efforts by choosing native, perennial plants. Perennials return each year and native varieties require less maintenance and are heartier. Include plants that bloom at different times of the year, from spring to fall.
- Prepare your space. Remove grass or other plant covers, create a raised bed, or add soil to patio pots. Add some compost or nutrient-rich soil to help your plants grow.
- Plant flowers or seeds. Follow frost guidance to avoid putting small plants in the ground too early. When risk of frost is gone, dig a hole just large enough for the root ball. Add extra compost and water regularly. Seeds need time to germinate and may need to go out in fall or winter; follow packet instructions.
- Maintain and enjoy. Make sure to water and weed your pollinator garden. The bees, butterflies, and other pollinators will thank you by visiting your flowers!
Thank you for making your backyard a welcoming place for pollinators and other wildlife. Learn about WDFW’s Habitat at Home program to learn other ways you can support wildlife in your neighborhood and community.
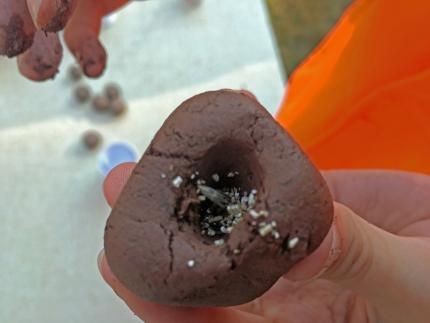
Activity: Seed balls
Making native wildflower seed balls is an easy way to improve pollinator habitat in your backyard. Each seed ball has all the ingredients to successfully grow wildflowers. The seeds are protected until rain breaks down the clay and releases them, and the compost gives seeds a soft place to start growing roots. Pollinators will enjoy the new wildflowers and you can practice your photography skills.
Gather your materials
- Compost or potting soil
- Powdered pottery clay (potter’s clay)
- Native wildflower seeds
- Water
- Large mixing bowl
- Drying rack or cookie sheet
- Flowerpot with soil (optional)
Instructions
- Mix two parts compost with one part clay in a large mixing bowl.
- Slowly add water and mix (using your hands is the most fun!) until it begins to stick together.
- Roll a quarter-sized amount into a ball.
- Poke a hole in the ball with your finger.
- Add a pinch of seeds and close the ball up. Repeat until you use all the mixture.
- Set seed balls on a drying rack for a couple days.
Simply toss your seed balls wherever you want flowers to grow. Seed balls grow best in areas without grass, including flowerpots and planters. There’s no need to cover it with dirt or water - nature will do the work!